Maintenance Tips For Your Diesel Particulate Filter
DPF Maintenance Requirements
The following are maintenance requirements to follow for servicing the DPF. Due to large variations on operating conditions, the maintenance schedule may change slightly depending on the specifics of the application. Below in Table 1, are requirements to follow for servicing the DPF.
|
Frequency |
Action |
Description |
|
Every 50 hours of operation |
Manual Back pressure Check |
Operate the engine at high idle. At exhaust port upstream of DPF install manual back pressure gauge. Record results in a log sheet. |
|
Every 200 hours of operation |
Check for leaks |
Make visual check of piping, fittings, clamps and gaskets in the exhaust system for exhaust leaks. Look specifically for evidence such as soot present near connection. Repair if necessary. |
|
Every 200 hours of operation |
Check Pressure Transducer |
Remove pressure transducer and apply pressure to the line. Check line for leaks. Indicator lights must illuminate at a specified back pressure. |
|
Every 1000 hours of operation |
Filter Cleaning |
Conduct Level 2 Cleaning (See Level 2 Cleaning below for details) |
|
Filter Cleaning |
Conduct Level 1 Cleaning or Level 2 Cleaning according to guidelines in Table 2 below. |
|
Manual Back Pressure Checks
When taking manual back pressure measurements, operate the engine at high idle. At an exhaust port upstream of the DPF install a manual back pressure gauge. Record results in a log sheet.
Table 2 – Manual Back Pressure Check
|
Reading |
Filter Condition |
Actions |
|
<5″wc(<1.25kPa) |
DPF is damaged |
Remove DPF and contact Foley Engines for further assistance |
|
5-25″wc (2.5-6.25kPa) |
DPF is clean |
No action |
|
25-40″wc (6.25-10kPa) |
DPF is moderately loaded with soot and/or ash |
Level 1 Cleaning or Level 2 Cleaning is required within the next 50 hours of operation |
|
>40″wc (>10kPa) |
DPF is highly loaded with soot and/or ash |
Remove DPF immediately and conduct Level 2 Cleaning |
Level 1 Cleaning
Standard Design
- Remove the DPF center-body using the quick-release clamps. Be sure to properly support the DPF upon removal as the filters are fragile and can break if dropped. Depending on the size of the DPF, this may take two people.
- Attach to the filter inlet (sooted end of DPF), a vacuum which feeds into a high-efficiency particle arrestance (HEPA) filter making sure that all connections are airtight to prevent soot/ash from escaping before being forced through the HEPA filter.
- Using compressed air (~80psi) blow the particulates/ash from the outlet end of the DPF towards the inlet of the DPF, through the vacuum and through the HEPA filter. The air gun should be held a minimum of 2 inches from the surface of the DPF to prevent damage to the filter itself.
- Move the air gun around to ensure that all of the DPF channels on the outlet have been exposed to the compressed air. Compressed air cleaning should be performed for an approximate duration of 10 minutes.
- Remove the HEPA filter and store away for re-use or dispose of if saturated with soot/ash.
Reinstall DPF center-body on given application and fasten securely using all applicable mounting hardware. - Perform a manual back pressure check at no load and high idle conditions to ensure that the Level 1 Cleaning reduced the backpressure build-up due to soot/ash removal. Back pressure should be less than initial back pressure reading before cleaning procedure.
Custom Design
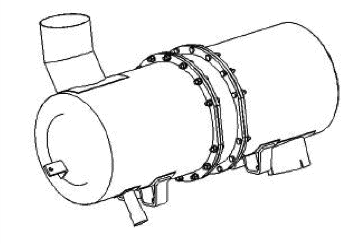
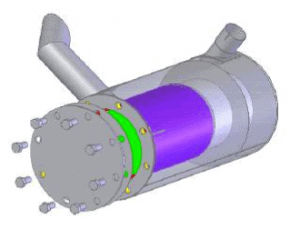
The majority of custom DPF designs are developed to replace the original equipment muffler. The two most popular designs allowing access to the DPF for cleaning are shown in Figure 1 and Figure 2 below.
 |
 |
|
| Figure 1 – Flanged Center-body DPF Muffler | Figure 2 –Bolted End-disc |
Custom Design 1 (See Figure 1)
- Remove DPF muffler from application in the same manner as if removing original muffler. Be sure to properly support the DPF upon removal as the DPFs are fragile and can break if dropped. Depending on the size of the DPF muffler, this may take two people.
- Remove DPF from muffler center-body by undoing the quick-release clamps or removing the bolts from the flanges in the center of the muffler.
- Perform Level 1 Cleaning steps 2-5 inclusive of Standard Design cleaning instructions above.
- Reinstall the DPF into the center-body of the muffler and secure it in place by either tightening the clamps or bolting the flanges.
- Reinstall muffler into application in the same manner as installing the original muffler.
- Perform a manual back pressure check to ensure that the Level 1 Cleaning reduced the back pressure build-up due to soot/ash removal. Back pressure should be less than initial back pressure reading before cleaning procedure.
Custom Design 2 (See Figure 2)
- Remove DPF muffler from application in the same manner as if removing original muffler. Be sure to properly support the DPF upon removal as the DPFs are fragile and can break if dropped. Depending on the size of the DPF muffler, this may take two people.
- Remove bolts on muffler body end-disc and remove disc from muffler exposing DPF inside.
- Attach to the muffler exhaust flow inlet, a vacuum which feeds into a HEPA filter and secure around the muffler inlet pipe to prevent soot/ash from escaping before being forced through the HEPA filter.
- Perform Level 1 Cleaning steps 3-5 inclusive of Standard Design cleaning instructions above.
- Replace muffler end-disc onto muffler and bolt to secure.
- Reinstall muffler into application as installing the original muffler.
Level 2 Cleaning
- Remove the DPF from the application. If it is a standard design, simply remove the quick-release clamps. If it a custom design DPF muffler such as Figure 1 or Figure 2 above, remove the DPF muffler in the same manner as the original equipment muffler. For removal of other custom designed filters, contact Foley Engines as necessary.
- Place the DPF center-body, inside an oven or kiln ensuring that the inlet and outlet of the DPF are exposed (i.e. DO NOT sit the DPF vertically in the oven so that the DPF inlet or outlet filter faces are against the surface on which the DPF is resting).
- Increase the temperature of the oven to 500*Cover a period of 1.5-2 hours.
- Retain an oven temperature of 500*C for a continuous period of 4 hours to allow complete combustion of accumulated soot in the DPF.
- Decrease the temperature back down to a temperature that will allow for safe removal of the DPF by hand.
- Remove the DPF from the oven and perform a Level 1 Cleaning to remove the non-combustible ash content.
- For standard DPF designs, reinstall DPF center-body into position on the application. For custom designs, either reassemble muffler by placing the DPF center-body into a muffler and clamping or bolting it into place, or reinstall the muffler end-disc by bolting it to the muffler.
- For custom design muffler replacements, reinstall the DPF muffler back into the application in the same manner as installing the original equipment muffler.
Is A DPF The Same As An Exhaust Scrubber?
DPFs while similar in some respects, are not the same thing as exhaust Scrubbers which are more focused on specific gas emissions. If you need to purchase a scrubber or just get a quote for a job you are bidding, fill in the details here on our website and our team will get you a quote right away. If you need to order a replacement DPF or have questions give us a call at 508-753-2979. Want to learn more about exhaust scrubber or DPFs, here are a few other tech tips you might be interested in:
- Tech Tip #103: How To Order A Diesel Exhaust Scrubbers For Your Equipment;
- Tech Tip #122: Diesel Particulate Filters: 9 Easy To Follow Details; and
- Tech Tip #181: Exhaust Purifier Installation Procedures